Every aggregate plant answers the same question differently, and the answer usually hides inside the belt. A vulcanised joint on a 1,200 mm steel-cord mainline feeding a primary crusher has to survive 5 m/s, 6,000 t/h and a head end that sits under open sky. The same task on a 650 mm stacker carrying minus-20 mm screenings is a two-hour repair between shifts. Both jobs are called aggregate conveyor vulcanizing, and planning them the same way is how a quarry loses a night of production it cannot recover.
We design belts for quarries and we send crews into them, so the splice is something we see from both sides. What follows is not another walkthrough of how a press works. It is how thickness, carcass type, dust, water, wind and a fixed shutdown calendar reshape the way a joint is planned, built, protected, accepted and signed off on a live aggregate line.

Across sand, gravel and crushed rock duty we specify joints for everything from a two-ply fabric belt on a screening deck to a heavy steel-cord carcass on the trunk conveyor, and we also inspect and re-cure splices that other contractors built. Nothing exposes a weak joint faster than an aggregate line, which is why the detail below matters more here than at almost any other duty point.
01Why a Quarry Rewrites the Splice Plan
A workshop splice is built on a flat floor, under a roof, with three-phase power, an overhead beam to lift the press and a storeman who can fetch a roll of tie gum in four minutes. A quarry splice gets none of that. The joint is usually built in the middle of the string, over a transfer chute or a drive station, and the nearest shelter may be a hundred metres away. That single difference drives every decision that follows, from how much gum we truck in to how many joints one crew can credibly finish before the plant restarts.
Aggregate belts are also physically heavier than most duty belts we see. Mainline trunks here run four to six plies of EP, or a steel-cord carcass with a 10 to 16 mm cover, and the belt can weigh well over 40 kg per metre. Moving a 1,600 mm belt end to align a joint takes rigging, not muscle, and the press itself may weigh two to three tonnes distributed over a heavy frame. A crew that plans a quarry splice the way it plans a plant splice will underestimate the rigging time by half.
What Our Crews Meet at the Face That a Workshop Never Does
Dust is the first visitor. Crushed rock fines settle on every buffed surface within minutes unless the joint area is closed off, and a layer you cannot feel with a fingertip is already enough to starve the bond. Vibration is the second, because a crusher, a screen or a nearby loader keeps the whole structure humming at 10 to 30 Hz even when the belt is stopped, and a press resting on a live frame can walk out of square during the dwell.
Power is the third constraint. On a remote stacker or overland conveyor the nearest industrial supply may be 300 metres away, and the crew ends up running platens off a hired generator whose voltage sags when the second ram pump kicks in. All three conditions are absent in a workshop, and all three change what a successful joint requires on site.
Why the Same Cure Recipe Underperforms in Open Air
Heat leaves a press faster when the air is moving. A platen that holds 150 °C inside a shop can drop two or three degrees at the edges of the same joint when a 15 km/h crosswind pulls heat off the uninsulated frame, and the shoulder of the belt is where the loss shows up first. On a site we surveyed in the mountains east of our own factory, ambient temperature swung from 4 °C before dawn to 31 °C by midday, and the crew cured the same joint build twice in one week with visibly different edges.
Cold ambient air slows the approach to cure temperature; hot ambient air can push an already warm belt past the point where extra heat starts breaking the network down. Neither is a reason to change the compound. Both are reasons to insulate the press, log the interface temperature rather than the platen gauge, and keep the joint out of direct wind.
02Belt Thickness, Ply Count and Carcass Type
The construction of the belt decides how long heat takes to reach the plies and how the load crosses the joint, and on aggregate duty those two numbers are rarely small. A 6 mm cover over two plies is a thin belt on a light duty; a 14 mm cover over a steel-cord carcass is a completely different thermal problem even though the press and the operator look the same. Thicker rubber is a better insulator, so the same platen temperature takes longer to travel to the bond line, and the dwell counted from the platen will flatter a splice that is still cold in the middle.
Cure data for each construction we ship stays with us, and a rubber conveyor belt maker hands that sheet to the crew. The differences below are the ones that actually move our planning on a quarry site.
Two-ply EP with a 6 mm wearing cover is the light end of quarry duty. Heat crosses those thin plies in minutes, so on a light belt we cut short steps and release the press two to three hours after clamp-up. Four plies change everything. Under a 12 mm cover the steps grow to a 320 mm pitch, a second interface probe has to sit deep in the step, and the dwell stretches by about ten minutes while the whole splice stretches by an hour.
Over a steel-cord carcass a 14 mm heavy-duty cover makes the thermal problem much worse, because the rubber bed is deep and heat has far longer to travel before it reaches the cords at the centre of the joint. One pass will not do. We cure them along the cord in two stages and hold pressure from first contact to release, and on a wide belt a single overlap of 1,200 mm is normal. The wear grade matters too. Wet gravel and sharp crushed rock will punish a patch that is softer than the cover around it, so we match the gum to the belt and never to the store shelf.
Steel Cord Carcass and the Longer Path Through Thick Cover
A steel-cord belt carries tension in parallel cords rather than woven plies, so a vulcanised joint here is not a step splice at all. The cords from each end are laid into a staggered pattern and bonded across an overlap that is commonly one belt width long, and the rubber between the cords does the load transfer. That geometry means the splice area is large, the rubber bed is deep, and heat has a long way to travel before the middle of the joint is cured.
Thick cover compounds slow that travel further. We routinely see a steel-cord joint need 50 to 60 minutes of dwell at the bond line, and a two-stage press arrangement is normal on wide belts because a single press cannot close over the whole overlap at once. Any crew treating a steel-cord joint like a fabric splice will open the press with the centre still raw.
EP and NN Belts on the Shorter Aggregate Slopes
Fabric belts still dominate the tail end of an aggregate plant, where transfer conveyors, screening decks, radial stackers and stockpile feeds usually run 650 to 1,200 mm wide and two to four plies. Step splices work well here, and the joint length stays modest because the running tension is lower and the cover is thinner.
Do not read that as easy, though. A four-ply EP belt with a 12 mm cover is a heavy splice by workshop standards, and the same belt on a steep incline carries more tension than a flat one. Our field crews treat ply count and incline angle together when they choose step length, because a short step on a loaded incline is where we find the first cracks.
03Splice Geometry on Heavy Carcasses
Step length is the single number that sets the ceiling on a fabric joint, and on aggregate duty that number is larger than most tables suggest. Every tonne of running tension crosses from one belt end to the other through the shear area between plies, so a longer step spreads the same load over more rubber. On belts with covers over 8 mm we avoid steps shorter than 250 mm, and on a four-ply mainline we commonly cut 300 to 350 mm per ply even when the belt is only 900 mm wide.
We draw the step layout for each order, and as an industrial conveyor belt supplier our field crews reproduce the identical geometry on site so a repaired section does not behave differently from the rest of the line. The temptation on a short shutdown is always to trim the step and save an hour. That hour is bought from the joint's service life.
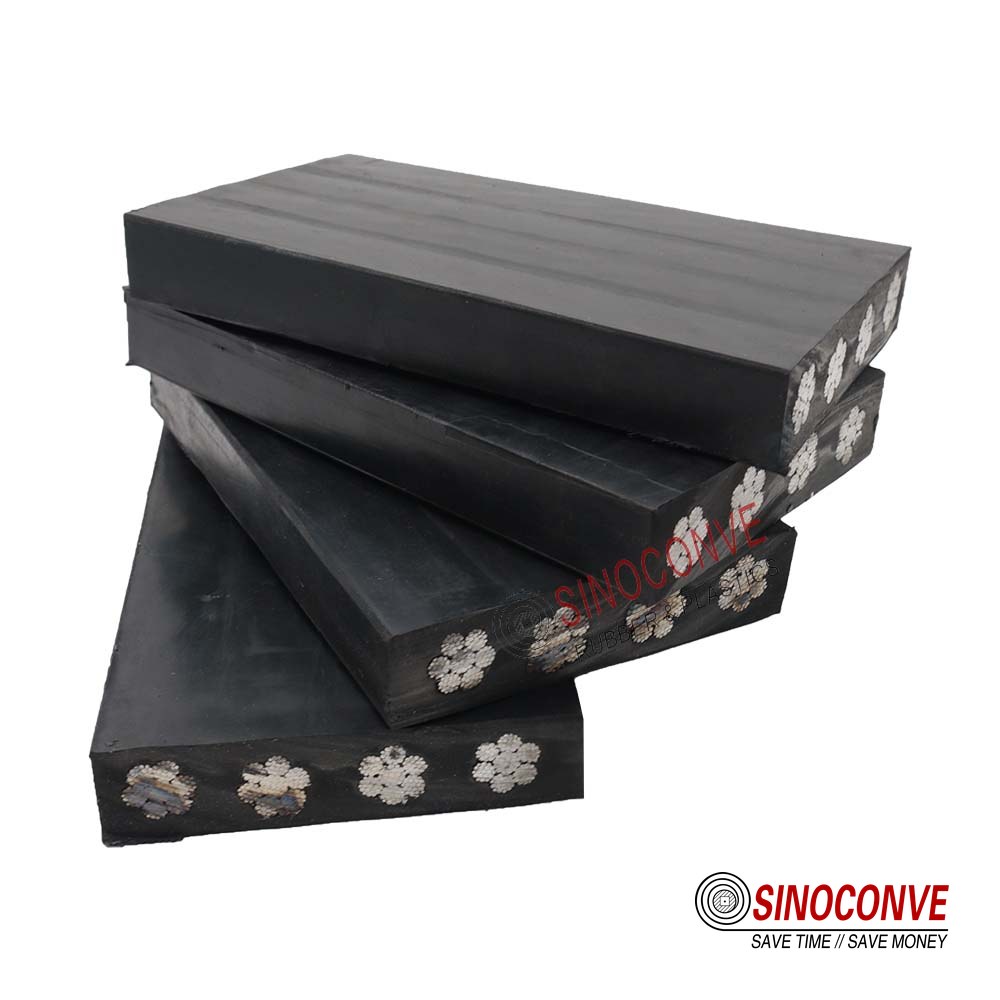
Step count follows ply count in a fabric belt, so three plies means three steps, and the ends interlock so no single ply ends at the same line as its neighbour. Steel cord is different, and a mis-stepped fabric layout copied onto a cord belt produces a joint that hammers every pulley it meets. Cords must be staggered so the gaps between them never line up across the joint width.
There is a reason we cap the step count on a very thick cover. More steps mean more shear area, but they also mean more cut faces, more chance of a nicked cord and more heat trapped in the middle of the splice. Past four or five steps on a heavy cover the extra area stops paying for itself, because the limiting factor becomes whether the centre of the joint cured fully rather than whether the rubber area was large enough.
Our working rule is to add step length before adding step count. A 350 mm step on a four-ply belt gives a stronger, more predictable joint than a 200 mm step on a five-ply belt of the same total thickness, and it is easier to keep square on site.
04Dust, Moisture and Interface Preparation at the Face
Buffing exposes fresh rubber and gives the cement a mechanical key; it also lifts a cloud of fines that settles straight back onto the surface it just cleaned. In a quarry this is not a minor nuisance but the dominant cause of early joint failure, because the dust and the belt are made of the same material and the contamination is invisible once it settles into a step.
Moisture arrives from two directions at once on an aggregate line. Aggregate is often washed or wet-screened, so the belt comes to the splice already carrying surface water, and the plies themselves absorb humidity from the air. A belt that has been running wet and then sits overnight under a tarpaulin is damp through the carcass, not just on the cover.
Removing quarry dust is a one-way operation. We vacuum the surface first, then wipe it with a clean lint-free cloth and solvent, moving away from the joint so contamination leaves rather than spreads. A buffing wheel should be run at low speed to avoid glazing the rubber, and the surface should finish matte rather than shiny. On a 1,400 mm joint with four steps, the cleaning stage alone takes 25 to 35 minutes, and cutting that in half is the most expensive shortcut available on the site.
Our field kit also carries a solvent wipe and a drying check. A clean thumbprint left on a ply after curing proves the surface was never properly handled, and a conveyor belt supplier who skips them is asking the crew to guess. If the solvent flashes off slowly or the buffed surface feels cool and damp, we stop and warm the joint before laying gum.
05Wind, Temperature Swing and the Weather Window
Weather is the one variable a quarry cannot control, and on aggregate duty it decides when a splice can be started rather than how it is built. Wind pulls heat off an open press and carries grit onto a buffed surface. Temperature swing changes how fast the belt approaches cure temperature and how long the joint needs to cool before it can be released under its own weight.
We plan around both. Insulation blankets over the press frame, a wind break on the upwind side and a work-time start chosen for the calmest hours all reduce the spread between the platen reading and the temperature at the bond line. On a coastal aggregate terminal we once measured 92 percent relative humidity at seven in the morning and moved the whole splice under a temporary shelter rather than fight the dew.
We read the wind and the temperature swing before the shift starts. When the daytime swing exceeds about 20 °C between the start and end of the shift, the joint cannot be planned on temperature alone. The crew logs the ambient reading at clamp-up, chooses the dwell from the interface probe rather than the clock, and holds the load until the belt surface falls below roughly 60 °C before breaking the clamps.
Wind speed matters as much as temperature. Above about 30 km/h we build a wind break as standard, because an unshielded press loses heat unevenly and the edge of the joint cools first. Two hours of preparation here routinely saves two days of rework later.
06Planning the Shutdown Window Around Several Joints
A single belt in an aggregate plant rarely needs one splice. A mainline trunk may have three or four joints spread along two kilometres, a stacker has a joint at each end, and a planned belt change can involve six or more splices on the same shutdown. The planning question is not how long one joint takes but how many joints a crew can finish, and in what order, before the plant restarts.
We build the schedule backwards from the restart. Whatever joints are furthest from the drive and hardest to reach are cured first, while the crew is fresh and the light is good; the joint nearest the workshop is left for the end of the window, when the crew is tired and the job is easy to supervise. This ordering sounds obvious and is ignored on most sites.
A quarry shutdown is a staging problem before it is a curing problem. The mainline steel-cord joint at the drive station gets the first twelve-hour window to itself, and two fitters plus a rigger need a full ten hours from clamp-up to a cooled belt. A tail-end fabric joint is the opposite. Three people can finish it beside the second splice in one shift, if the two joints sit close together. On a 1,400 mm mainline the bonded overlap runs the entire width of the belt, so the set point is held near 148 °C, the dwell is counted at the cord bed rather than at the platen gauge, and the press is staged along the joint in two passes.
Two stacker joints at opposite ends go in on consecutive nights. A belt that has just been cured should never be moved hot, so the second joint waits for the next window. Six joints change the arithmetic. A full belt replacement becomes a staging problem rather than a curing one, with two presses, three windows, two teams of three and a float window kept clear.
Crew Size, Man-Hours and the Tooling We Truck In
On aggregate work we rarely send fewer than three people to a mainline splice, and a steel-cord job gets four. One fitter prepares the belt, one runs the press and logs the cycle, and a third handles rigging, the hold-down bars and the tool change. That split matters because a single person cannot cut, clean, clamp and monitor at the same time without dropping a step.
The tooling list for a quarry splice is longer than the workshop version because nothing can be borrowed from a bench. We truck in the press and its frame, two or more interface thermocouples, bar clamps, hold-down bars, a buffer and spare wheels, a hot knife and a spare blade, solvent, lint-free cloths, tie gum and cover gum matched to the belt, a hand roller, a tap hammer, a straight edge and a tape, and a generator rated above the press load.
Spares are planned rather than hoped for. We carry an extra step's worth of gum, a second set of thermocouples and a spare ram seal, because a failed seal at hour six of a twelve-hour window ends the shift. Nothing on that list is exotic, and none of it is optional on a site where the nearest supplier is a two-hour drive away. As a conveyor belt distributor we keep that field kit stocked so a crew leaves the plant ready rather than hoping to improvise.
07Contamination Control on Site
In a workshop the environment is already clean, so the crew only has to keep it that way. In a quarry the crew has to create a clean zone where none existed, and then defend it for the six to ten hours the splice takes. That is a different job, and it needs its own plan rather than a reminder to work tidily.
The clean zone starts with isolation. We stop the belt, lock out the drive, and screen the joint area on all four sides with tarpaulin or plywood sheets so running plant nearby does not rain fines onto the exposed step. Anything that moves air, from a nearby screen to a passing loader, gets a barrier between it and the work.
Building a Temporary Clean Zone Around the Joint
We lay a clean sheet under the joint so that anything dropped stays clean, and we keep the solvent, cloths and gum off the ground and out of the dust. Tools are wiped before they touch a buffed surface, and the buffer is used in short passes with the dust vacuumed away between them rather than allowed to pile up. On a 1,600 mm joint this preparation is thirty minutes of work that decides whether the cleaning stage later holds or has to be repeated.
As a conveyor belt manufacturer we build our joints to the same standard on our own trimming tables, and customers who watch both processes tell us the field version is stricter, not looser, because the consequences are worse. A clean zone is cheap to build and impossible to replace once the gum is down.
Solvents, Drying Time and the Wet-Thumb Test
Cement is a carrier, not the bond itself, and it needs a dry, matte surface to wet properly. Two thin coats beaten into the rubber work better than one heavy coat, and each coat has to flash off before the next goes down. A heavy coat seals solvent in the middle of the layer, where heat has to travel furthest to drive it out, and that geometry produces the blisters we are called out to repair.
Simple checks keep us honest. If the solvent takes more than a few minutes to disappear, or the buffed surface feels cool and damp to the back of the hand, the joint is not ready. Warm air and patience beat a rushed coat every time, and a joint assembled wet will not be saved by extra dwell.
08Rain, Fog and Blowing Sand
Water and grit both attack the same interface, and on aggregate duty they usually arrive together. Rain wets the buffed surface and soaks into the plies; fog condenses on any cool rubber and keeps the surface damp for hours; blowing sand lands on the cement while it is still open and locks itself into the bond. The response is the same in every case, and it starts before the first cut.
We read the forecast the way a rigger reads a load chart. If rain is likely inside the planned window, the splice moves under shelter or waits; if it is a marginal day, the crew builds a tent and keeps warm moving air on the joint. A six-hour joint is worth delaying to the next calm window rather than curing in weather that will not hold.
When We Stop, When We Shelter, When We Tent
Light rain with a wind break and warm air is workable. Heavy rain, standing water on the belt or visible moisture between the plies is not, and no amount of drying on the surface will reach water already absorbed into the carcass. Blowing sand above about 30 km/h gets the same answer as heavy rain, because a covered joint still lets grit in while the press is open.
On one site our crew spent an extra four hours under a tarpaulin in a storm rather than lay gum on a wet belt, and the joint has now run six years on a 3.5 m/s mainline. As a conveyor belt factory we mention that story whenever a customer questions whether a shelter is really necessary on a dry-looking day.
09Quarry-Side Acceptance of a Finished Joint
Release is a decision, not a formality, and on an aggregate line the decision has to be made where the joint sits rather than in a lab three days later. Four of the five checks we run can be completed on site in under half an hour; the fifth needs a sample and a press. Plants that buy wholesale conveyor belts and run their own maintenance crews use the same list, which is why we publish it openly.
| The acceptance check we run at the plant | How the crew carries it out on site | What sends the joint back for rework |
|---|---|---|
| A visual pass along both edges and the step line | We look for even colour, no glossy patches and no soft shoulders | Any tacky area or lifted cover we can lift with a fingernail |
| The centre line checked against the belt edge | We string a line along the joint and measure the offset at each edge | A centre-line deviation beyond about 2 mm over the belt width |
| A tap test with a light hammer at fixed intervals | We tap every 150 mm and listen for a firm ring over solid rubber | Two or more dull spots grouped close together on one step line |
| An ultrasonic scan on critical mainline joints | We run a probe along the joint and compare the trace with a cured reference | A signal that drops away or echoes where the joint should be solid |
| A destructive peel and tensile sample from the same cycle | We cure a coupon alongside the joint and pull it in the plant lab | Joint efficiency below about 85 percent of the parent belt strength |
Tap, Ultrasound and the Centre-Line Measurement
The tap test is older than any of us and still the fastest way to find a hollow zone on a quarry joint. A light hammer at 150 mm intervals takes about six minutes on a 1,400 mm splice and returns a clear ring over solid rubber and a dull thud over a void. Ultrasound does the same job with a record attached, so we use it where a joint is critical enough to be worth the time and where the customer wants a trace for the file.
The centre-line check is the one most crews skip, and it is the one that predicts how the belt will track after restart. A joint squared within 2 mm across the width feeds evenly into every pulley downstream; a joint that is 8 mm out will drag one edge across the run and start a tracking problem that looks like a roller fault but is not.
10Run-In Monitoring for the First 24 to 72 Hours
A joint that passes acceptance has not finished proving itself, because the first few shifts under load are when a marginal splice declares itself. We ask plants to watch a new aggregate joint closely for one to three days, and to log what they see rather than rely on memory. The three checkpoints below cover almost every early failure we have seen.
On smaller drive belts the same discipline applies, and one of our plants acts as a transmission belt manufacturer for units where a soft band across a section shows up within hours of restart. The physics is the same whether the belt is 1,600 mm wide or 17 mm wide.
What to Watch in the First Three Shifts
In the first shift we watch the joint as it passes each pulley, looking for any lift at the step edge, any change in the sound as it crosses the drive, and any creep of the joint centre line away from the belt centre. In the second and third shifts the focus moves to the shoulders: a joint that cures unevenly shows a soft or tacky edge under load, and that edge is where material and water arrive first.
By 72 hours a healthy joint has settled and looks much like the belt around it. A joint that is still changing after three shifts is telling you the cure was marginal, and it is worth pulling the cycle record before it fails on a busier day. Working through the same logic on a narrow drive belt, where a single plant of ours operates as a V-belt manufacturer, the warning signs arrive faster because the sections are thin, but the pattern is identical.
Field note from our engineers: On a 1,400 mm steel-cord mainline we opened a press at 96 °C because the plant wanted the belt back before shift change, and the joint looked perfect. Four days later the cover lifted along the whole width, and the second repair cost two shifts instead of the half shift the crew thought they were saving. We have not opened a hot press on aggregate duty since.
11Field Vulcanizing, Full Replacement or a Temporary Fastener
The first question on any aggregate line is not how to cure the joint but whether to cure one at all. A quarry running a 2 km mainline may be better served by replacing a tired belt outright than by rebuilding the fourth splice on a carcass that is already delaminating, while a plant that lost a single stacker joint on a Friday night wants the belt running by morning. The decision turns on how much of the belt is still sound and how much time the plant has.
We treat three options as a decision, not a default. A vulcanised splice restores full strength when the carcass around it is healthy; a mechanical fastener buys time when it is not; a belt replacement is the honest answer when the damage is no longer local. Choosing wrong is expensive in both directions, so we make the call on evidence from the belt rather than on the shutdown pressure.
| The situation we find on the aggregate line | The action we recommend for it | The reason this is the cheaper choice |
|---|---|---|
| The belt is sound and the damage is confined to one joint | We cut the joint out and cure a new vulcanised splice on site | A local rebuild restores full strength without buying a whole belt |
| Covers are worn through and the carcass is showing in several places | We replace the belt instead of chasing repairs along its length | Each patch on a failing carcass simply delays the next failure |
| The belt is good but the shutdown window is far too short to cure | We fit a temporary mechanical fastener and schedule a proper splice | Fastening costs a little joint strength but saves production tonight |
| A steel-cord joint has failed inside the cord bed | We take the joint off-line and rebuild the cord overlap in full | A patch over cords will not transfer load evenly across the width |
| The belt is near end of life and production cannot stop for a change | We bridge the joint mechanically and order a replacement in parallel | It keeps the plant running while the new belt is built and shipped |
Rebuild Now, Replace the Belt, or Fasten Temporarily
Two tests settle most cases. Start with the carcass, because if plies separate cleanly under a thumbnail and the fabric smells damp, the belt is telling you it is finished. Reachability is the other question, since a joint buried under a chute that demands scaffolding and a work permit will always lose to a mechanical fastener when the window is short.
Given a healthy carcass and a reachable joint, we vulcanise. Given a tired carcass, we quote a replacement and keep the line moving meanwhile. Mechanical fasteners are a bridge, not a solution, and on aggregate duty with sharp, wet rock they typically last weeks rather than months.
12Why Aggregate Joints Crack Early
Early joint failure on a quarry belt rarely has one cause, and it almost never has a cause the crew has not seen before. The same four patterns come back season after season, and each one leaves a signature that can be read before the press reopens. Two of them come from the cure, and two from how the joint was built before the press ever closed.
Sharp, wet, abrasive rock does the rest. It hammers the joint at the loading point, works water into the shoulders and grinds the step line until a marginal bond opens. A joint that would last years on a clean bulk material can fail in weeks on crushed granite, which is why the prevention column below is worth more than the repair column.
| The failure we find on an aggregate joint | How it presents once the belt is running | The cause we usually trace it back to | The prevention we build into the next splice |
|---|---|---|---|
| Cracks opening early along the step edge | Fine tears appear at the shoulder within the first few weeks | Steps cut too short so the shear area never carried the tension | We cut longer steps and feather the cover over a 50 to 80 mm taper |
| Plies that do not line up once the joint has cured | One end sits higher and the joint hammers every pulley it meets | Ends measured from a fixed mark instead of forward from the cut edge | We mark every step forward and check square before any gum goes down |
| Hollow, soft shoulders along the outer edge | The edge sounds dull under a tap and lifts under load | Pads too thin or too narrow to carry pressure to the belt edge | We use pads at least 20 mm thick and check pressure across the width |
| Cover lifting away from the cord on a steel-cord splice | A raised patch opens along the joint after a few days of running | Solvent or moisture sealed under a heavy cement coat in a deep bed | We apply two thin coats, dry each fully and roll from the centre out |
Early Cracking, Mis-Stepped Plies and Edge Voids
The three failures above are the ones that bring crews back to the same belt, and each has a physical reason rather than a mysterious one. Cracks at the step edge mean the shear area was too small for the running tension. Mis-stepped plies mean the two ends were not measured the same way. Edge voids mean the pressure never reached the shoulders, usually because the pads were undersized for the belt width.
None of these is fixed by curing longer or hotter. They are fixed by building the joint differently, which is why we record the step length, the pad size and the pressure spread on every splice we leave behind.
13Records and Handover for the Plant File
A quarry that keeps joint records finds that its second splice on a given conveyor is always better than the first, because the paperwork carries the lesson forward. The record we leave behind is one page, and it covers the belt, the crew and the cycle rather than just the outcome.
The Handover File a Quarry Auditor Wants to See
We hand over the belt identification and ply count, the joint number and its location along the conveyor, the step geometry, the compound and cement batches with their dates, the two ends marked square, the set point, the actual ramp time, the dwell counted from the bond line, the release temperature and the names of the fitters. Where a sample was pulled we add the peel and tensile result, and on steel cord belts we note how the cords aligned across the overlap.
That sheet turns a dispute into a discussion. When a joint fails at eleven months, the record shows whether the cycle was held or whether the night crew was working against a generator that kept tripping, and the answer usually points straight at the cause. Record what you actually measured, not what the procedure told you to expect.
14How This Guide Divides Work With Our General Splicing Article
We publish a companion article on the general vulcanising process, and the two pieces are meant to be read together rather than compared. The companion article covers the shared sequence that applies to any belt on any duty: the eight build stages, the temperature, time and pressure window, defect modes in general, and the release criteria a workshop would use. It is the process.
Everything here is added by the aggregate setting. Thick covers and steel-cord carcasses that move the cure window; multi-splice shutdown planning across several joints; contamination control in an open pit rather than a shop; the weather plan for rain, fog and blowing sand; quarry-side acceptance and run-in; and the decision between curing, replacing and fastening. Our companion piece does not repeat those site conditions, and this one does not repeat the general cycle. A reader who wants the shared process should start there and finish here.

15Frequently Asked Questions
Does aggregate conveyor vulcanizing take longer than a workshop splice?
Yes, and the gap is almost entirely rigging and weather rather than curing. Cutting, cleaning and clamping on a quarry mainline can take twice as long as the same stages on a bench because the belt cannot be moved to the work. Plants should budget a full shift for a mainline joint and treat anything faster as a bonus, not a target.
Can a steel-cord joint be cured on site, or does it belong in a workshop?
It can be cured on site, and on a long overland conveyor it usually has to be. The catch is that a steel-cord overlap is commonly one belt width long, so the press is staged along the joint and the dwell is counted at the cord bed rather than at the platen. When a plant has a spare length of belt and good access, curing a section in the shop and hauling it in can still be the better option for mining and quarrying duty. What we would not do is run a steel-cord joint through a single press cycle and call it finished.
How many joints can one crew complete in a twelve-hour shutdown?
One mainline splice is a realistic full shift, and a three-person crew will only add a short tail-end fabric joint alongside it when the two sit close together and travel time is small.
What is the single biggest cause of early joint failure in a quarry?
Contamination, and it is usually the kind nobody can see. Quarry dust settles into the step within minutes, water gets into the plies when a washed belt is spliced the same day, and both starve the bond without leaving an obvious mark. If the buffed surface is not matte and dry when the cement goes down, nothing later in the cycle will rescue the joint.
Do we have to stop the whole plant to cure one joint?
You have to stop the belt and lock out its drive, and you have to keep anything that throws dust or vibration off the work area.
How soon can we load a new joint at full tonnage?
Not on the same shift it was released. A joint cures to strength in the press but continues to settle under load, so we ask plants to run the belt at reduced tonnage for the first few hours and to watch the joint at every pulley. Full load is fine once the joint has held its shape through a full shift without creeping, and by 72 hours a healthy splice looks like the belt around it. Sudden full load on a warm joint is how a good splice turns into a soft edge.
Is a mechanical fastener ever an acceptable permanent repair?
Rarely on a mainline and almost never on steel cord, because a fastener grips the belt between plates rather than fusing the carcass, so it holds a fraction of the belt's strength and wears the belt at every pass.
What weather actually stops a field vulcanising job?
Heavy rain, standing water on the belt and blowing sand above roughly 30 km/h all stop the work, because each one puts something between the two surfaces that should bond. Light rain, cold air and a damp morning are workable with a tent, insulation and warm air, and this is where a lot of dust and weather protection planning pays off. If moisture has soaked into the carcass rather than just the cover, no amount of drying on the surface will help.
How do we verify a joint without cutting a sample out?
You cannot prove it fully without a sample, but you can build strong evidence on site: interface probes that reached set point, a dwell counted from the bond line, pressure checked across the width, a centre line within about 2 mm and a tap test that rings clean. Taken together with the cycle record, that set of observations is what most quarries accept before restarting. Where the joint is critical, we cure a coupon alongside it and pull it in the plant lab.
Should we stock our own splice materials or rely on the contractor?
Stock the consumables that run out at the worst moment and let the contractor bring the rest. Matched tie gum and cover gum, solvent, lint-free cloths and a spare step's worth of gum are cheap to hold and expensive to be without at hour six of a shutdown. The press, the thermocouples and the specialist tooling are better left with the crew that uses them every week.
Related Products You May Need
- Steel cord belts for aggregate mainlines
- Rubber conveyor belts in EP and NN carcass builds for quarry and crusher duty
- EP rubber belts for long centres and heavy running tension
- Heat resistant grades for clinker duty
- Chevron and profile belts for inclined quarry conveying in wet conditions
- Full belt catalogue for splicing and replacement planning
Related Blog Posts
- Quarry and crusher belt selection
- Abrasion resistant conveyor belts for quarry and aggregate lines
- Heavy duty rubber conveyor belts for mining and hard rock duty
- EP belt selection for stone crusher and aggregate plants
- Steel cord rubber belt durability under heavy material handling
- Impact rollers and loading zones that protect a new joint on an aggregate line
- Splicing methods, costs and field tips compared
- Twelve checks to run before you order a spliced belt
- Return side cleaning to protect joints and pulleys
- Cover grades explained for buying and replacement