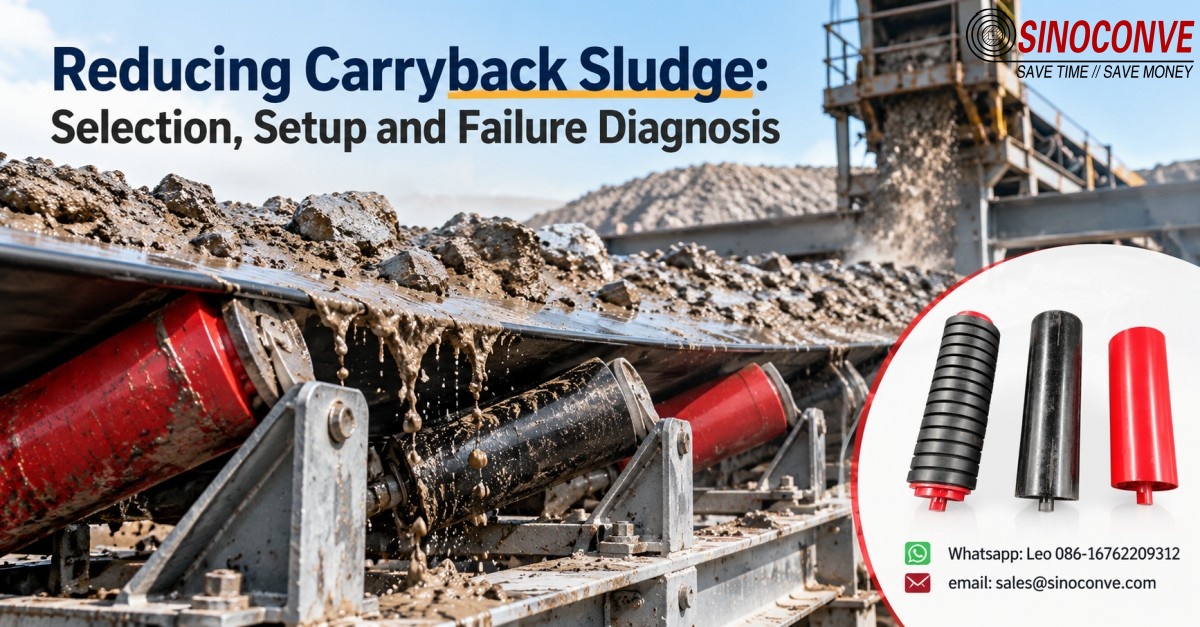
Carryback stops being a housekeeping nuisance the instant it turns into sludge. Wet fines that drop onto the return strand pack into the idlers, force the belt off center, and trip the line — usually weeks before the extra cleaner you ordered ever earns its keep. If you already run scrapers and the mud keeps coming back, the answer is seldom a second scraper. It is upstream containment, return-side flow control, and a wash-and-sump loop that actually drains.

01When to Treat the Sludge Instead of Adding Another Cleaner
We split the problem in two on purpose. Dry carryback is material that clings to the cover, rides back over the head pulley, and falls somewhere along the return run. Sludge is what that same material becomes once it meets water: a paste with enough cohesion to smear, pack, and build a ledge inside the structure. The two behave differently, and they need different money spent on them.
A dry powder spill can usually be swept, and a well-set scraper will knock most of it off at the head. Sludge does not respond to either. It flows into the idler gaps, sets hard overnight, and rebuilds itself from the inside of a roller shell. That is why we tell maintenance teams the same thing every time we walk a wet line: fix the water and the flow first, and only then look at another blade. As a conveyor belt manufacturer, we have watched buyers spend two seasons stacking scrapers on a belt that simply needed its loading chute sealed.
Field note from our engineers: On a finish mill line running at 42 °C we weighed the idler closest to the head pulley at 38 kg of caked fines after one 12-hour shift. The belt was still tracking, but the return side ran 11 °C hotter than the carrying side. We knocked the idlers clean, the shell temperature dropped back within 2 °C, and the drive amperage fell by 9 A. Nothing about the scrapers changed.
The trigger to stop buying cleaners and start fixing the system is simple. If your return idlers are glazed with mud, your skirt seals are worn through, and your sump overflows every wet season, you have a sludge problem. Measure it before you spend. A 15-minute check of the belt edge and the idler faces under the head pulley will tell you more than a new blade ever will.
How to read the problem in fifteen minutes: park the belt, and run a gloved hand along the underside of the return cover about a meter past the head pulley. A dry dusting means a scraper tune-up is all you need. A wet smear you can press flat with your thumb means moisture is already winning, and the money belongs upstream in containment and drainage, not in another blade. Write down what you find, because a month from now you will want to know whether the line got better or just moved the mess somewhere else.
02The Carryback Cause Chain: Adhesion, Scraping, Then Secondary Buildup
Carryback does not appear all at once. It follows a three-step chain, and each step gives you a different place to interrupt it. Step one is adhesion at the carrying surface. Step two is partial removal at the head. Step three is what we call secondary buildup — the fraction that escapes, re-entrains moisture, and deposits itself somewhere it should never be. Understanding which step is dominant on your line decides whether you buy a blade, a skirt, or a drain.
Moisture Is the Multiplier
Dry fines fall away under their own weight. A fine limestone dust at 1–2% moisture leaves the belt with little effort. Raise that same material to 6–8% moisture and the picture flips. Capillary forces hold a film of fines against the cover, and the film has enough shear strength to ride over the head pulley, past a worn scraper, and down the return strand. We have measured the difference directly: the same rubber conveyor belt carrying crushed stone carried away roughly four times the residue once surface moisture passed 5%.
The moisture rarely comes from the product alone. Ambient rain, a badly aimed spray bar, or a leaking gland on a nearby pump will all raise the local moisture just enough to turn a dust nuisance into a paste. That is why a sludge problem so often appears overnight after a rain event, or right after a washdown crew changes its routine.
Particle Size and Stickiness: Fines Pack, Lumps Tear
Particle size decides what the leftover material does next. Sub-200-mesh fines pack into a dense, low-permeability layer that holds water like clay. Coarser, angular lumps do not pack; they bounce, wedge, and tear at your skirt seals and idler faces. On an industrial conveyor belt moving a blend of both, you get the worst of both worlds: a sticky base layer from the fines, and a hard cutting fraction from the lumps.
Sticky materials — clays, wet ash, filter cake, damp gypsum — add one more variable. Their carryback does not just sit on the cover; it smears. A smear layer builds thickness every revolution, and after a few hours it becomes a raised bead along the belt edge that catches the skirt and forces the belt sideways. That edge bead is one of the first signs we look for when a "cleaner problem" turns out to be a loading-zone problem.
03Transfer Point Containment: Skirtboards, Chutes and the Drop Trajectory
Most carryback is born in the loading zone. Material that lands gently, centered, and inside a sealed chute has far less chance of becoming a sticky film. Material that slams in off-center, splashes, and sprays out under a worn skirt turns into spillage and carryback at the same time. The cheapest tonne of sludge you will ever eliminate is the one that never leaves the transfer point.
Skirtboard Geometry and Wear
A skirt that is too long adds drag and heat. A skirt that is too short lets the material boil out the sides. We generally size the sealing run so the material has settled from the impact zone to a stable profile before the skirt ends, which on a fast belt can mean a meter or more of skirt length. The skirt rubber should sit against the belt in the direction of travel, and the gap should be checked cold, not after the belt has warmed and stretched. A 3 mm gap at startup becomes a 10 mm leak at operating temperature.
Wear tells the story. If your skirt seals wear on the inside face, the belt is wandering. If they wear on the top edge, material is backing up and running over the top. If they scallop along the bottom, you have a bowed or cupped belt edge. Each pattern points to a different fix, and none of them is another scraper at the head pulley.
Why the Drop Trajectory Decides Where the Spill Lands
The material does not care where you want it to land. It follows the velocity it leaves the feed point with, minus what the chute and the head pulley steal from it. When the trajectory is wrong, the stream hits the chute wall, splashes, and throws fines backward onto the belt edge. Those fines ride under the skirt, out the side, and into the return strand as sludge.
We like to see the transfer designed so the incoming stream lands at the same speed and direction as the receiving belt. That means matching the chute angle to the stream velocity rather than forcing a 90-degree turn. A lined rock box or a curved chute that drops the stream dead center takes pressure off the skirt and cuts the splash fraction sharply. In our own conveyor belt factory test runs, centering the drop reduced the residue left on the belt edge by more than half, with no change to the belt or the cleaners.
Under the drop, the belt needs support as much as the chute needs a seal. A sagging belt at the loading point bounces, and a bouncing belt flings fines out sideways even when the skirt looks tight. Impact beds with a low-friction top surface keep the belt flat through the drop, which holds the stream inside the chute and stops the edge splash that later becomes carryback. On heavy, lumpy stone we also check the bed height against the idlers on either side; a bed set 4 mm proud of the line digs into the cover, while one set low lets the belt slap and pump material out under the seal.
04Return-Side Material Flow and Idler Fouling: Why Sludge Kills Tracking First
Once material reaches the return strand, it stops being a spill and becomes a mechanism problem. Sludge on the return side sticks to the idler shells first, not the belt. It builds a raised lip on each roll, and that lip is what pushes the belt sideways. Tracking failures on a wet line are almost never a pulley problem — they are an idler fouling problem that was left long enough to look like one.
The Fouling-to-Misalignment Chain
The sequence is consistent, and we have documented it on dozens of lines. Wet carryback deposits on the top of a return idler. The next pass of the belt presses it into a thin, hard layer. That layer grows into an uneven crown, and the crown steers the belt toward one edge. The belt then rides against a fixed guard or a structural member, the edge wears, and the whole system loads up. Within a few shifts the operator is chasing the tail pulley, when the real fault sits under the head pulley.
Fouled idlers also drag. A roll that should free-spin now turns against a coating of packed fines, and the added resistance shows up as higher amperage and hotter shells. We cited the 9 A drop in section 01; that is not an outlier. It is what happens when a coated roll finally turns freely again. Self-cleaning or sealed conveyor rollers help, but only if the wetting is reduced upstream. A roller that sheds fines in dry service will still glaze under a steady spray.
Why the Middle Idlers Fail First
You would expect the idler nearest the head pulley to foul hardest, and it does load up first. But the middle of the return run fails more often over the long term. Material that falls at the head gets distributed along the run by belt vibration, and the center rolls carry the most of it because that is where the belt sags deepest. The sag creates a trough, the trough holds the fines, and the fines pack against the roll face. If your middle return rolls are the ones seizing and flat-spotting, that is your confirmation that carryback is migrating down the line rather than dropping off early.
On a line we will size fully in section 06, a 1,200 mm belt at 2.8 m/s carrying 1,000 t/h of damp crushed limestone sheds roughly 20 t of carryback a day. Even a small fraction of that landing on the return rolls is enough to coat every idler on a 300 m conveyor in a single shift.
05Wash Water and Slurry: Volume, Reuse and Solid-Liquid Separation
Water is the difference between a dust problem and a sludge problem, but water is also the tool that removes the sludge once it forms. The trick is to use just enough to move the fines and no more, because every extra liter of water becomes liquid you now have to pump, settle, or treat. On most lines we visit, the wash system is pouring far more water onto the belt than the slurry handling downstream can accept.
Water Pressure That Cleans Without Making Paste
Pressure does the work; volume makes the mess. A spray bar at 2–4 bar will knock loose most carryback that is still fresh. Crank it to 8–10 bar and you blast fines into every bearing, seal, and splice on the return side, then you leave a pool that re-wets the belt. We target the lowest pressure that still clears the film, and we aim the nozzles at the belt just behind the head pulley, angled so the water and solids run toward the sump instead of being carried forward onto the next idler.
Flow rates matter more than most teams realize. A single misaligned 8 mm nozzle at 4 bar can pass well over 20 L/min, and a row of them adds up to a river by the end of a shift. If the goal is reduced carryback sludge, the wash water should be measured like any other process stream — with a flow meter, not a guess. A detailed guide to spray design lives in our conveyor belt spray cleaning article, so we will not repeat that menu here.
Reuse: Fines Dewatering and Clarified Water
The cheapest water is the water you do not have to treat twice. Slurry that is caught early can be run through a simple dewatering screen or a settling cone, and the clarified water can return to the spray bars. The key is to separate the solids before they reach the sump, because a sump full of settled fines is harder to clean than a screen that drops dry solids onto a collection pad.
Solid-liquid separation also changes the size of everything downstream. If you pull the fines out at the transfer point, the water left in the sump is mostly clear and can be pumped with a standard sump pump. If you let the fines ride all the way down, you are pumping abrasive slurry, and the pump, the pipe, and the cleaning labor all cost more. The split between the two is the single biggest lever on a wet-line operating budget.
Which separator you pick depends on the fines. An inclined wedge-wire screen handles coarse, fast-settling material and needs almost no operator attention. Fine clays and filter cakes plug a screen, so those go to a small hydrocyclone or a settling cone with a measured flocculant dose. We have run both on the same site: the screen ahead of the cone catches the coarse fraction, and the cone polishes the fines out of the overflow. The equipment is not exotic — the discipline of putting it before the sump is the part most plants skip, and it is the part that makes the difference.
06Sump and Collection Pit Design: Capacity, Slope and Cleaning Windows
The sump is where every upstream mistake shows up. If the chute leaks and the spray bar floods, the sump overflows. If the sump is too small, the crew lets it fill, the sludge backs up under the belt, and the whole return run re-wets itself. Getting the sump right means sizing it to the real daily sludge volume, not to a rule of thumb that someone wrote down years ago.
Here is the worked calculation we promised earlier. Take a crushed limestone line: 1,200 mm belt, 2.8 m/s, 1,000 t/h, running 18 hours a day, material at about 7% moisture. Belt surface area past the head pulley each day is 2.8 m/s × 3,600 s/h × 1.2 m × 18 h = 217,728 m²/day. With carryback measured at 90 g/m² after the primary scraper, that is 217,728 × 0.09 kg = 19.6 t of carryback a day — roughly 0.11% of the 18,000 t/day throughput, which is a typical sticky-fines figure.
Not all of that becomes sludge. On this line, about 40% of the carryback lands under the return strand and gets wetted by the wash water, so sludge solids are 19.6 × 0.40 ≈ 8 t/day. Two spray bars at 30 L/min each, run for 10 hours, deliver 36,000 L = 36 m³ of water a day. If the sludge settles to 25% solids by mass, its total mass is 8 ÷ 0.25 = 32 t/day, holding 24 m³ of that water in the sludge itself. The remaining 12 m³ stays as free water and runs to the sump on its own.
Now size the pit. Wet sludge has a bulk density around 1.15 t/m³, so 32 t is about 27.8 m³. Add the 12 m³ of free water and the daily inflow is roughly 40 m³. Clean the sump once every 8 hours — one window per shift — and you need to hold about 13.3 m³ per window. Add 25% freeboard and you arrive at a 16–18 m³ sump. Skip the shift cleaning and clean once a day instead, and the same line needs a 40–45 m³ pit. The cleaning frequency and the pit volume are the same decision made twice.
Slope and geometry decide whether the pit actually empties. We specify a floor slope of at least 5–7% toward the pump suction, and we keep the suction in a small recessed pocket so the pump never runs dry on a half-full pit. Dead corners are where sludge sets into a block that a front-end loader later has to chip out by hand. A sump that is wide and shallow clogs faster than one that is narrower and deeper, because the solids settle out in the quiet corners before they ever reach the pump.
07Component Combination Matrix: Where Each Part Fits
No single component fixes carryback sludge on its own. The parts only work as a chain, and each link has a job, a failure mode, and a check interval. The matrix below is the one we hand to a maintenance crew on a wet line. Read it left to right: the location tells you what to look at, the component tells you what is supposed to happen there, and the last two columns tell you how it goes wrong and when to look.
| Location | Component | Function | Failure symptom | Check interval |
|---|---|---|---|---|
| Transfer chute | Skirtboard and seals | Contain the stream, stop side spill | Seal scalloping, dust blowing out the sides | Weekly |
| Loading zone | Impact bed and impact rollers | Absorb impact, keep the belt flat under load | Cracked bars, belt sag, spillage through the bed | Monthly |
| Head pulley | Primary scraper | Remove the bulk of carryback at the head | Blade chatter, a streak of fines past the blade | Weekly |
| Return strand | Return idlers and self-cleaning rolls | Support the belt, shed dry fines | Glazed shells, seized rolls, flat spots | Weekly on wet lines |
| Return strand | Spray bar and nozzles | Wet and flush carryback toward the sump | Clogged nozzles, flooding past the bar | Each shift |
| Sump area | Sump, pump and dewatering screen | Collect, separate and discharge the slurry | Overflow, air lock, settled fines blocking suction | Daily |
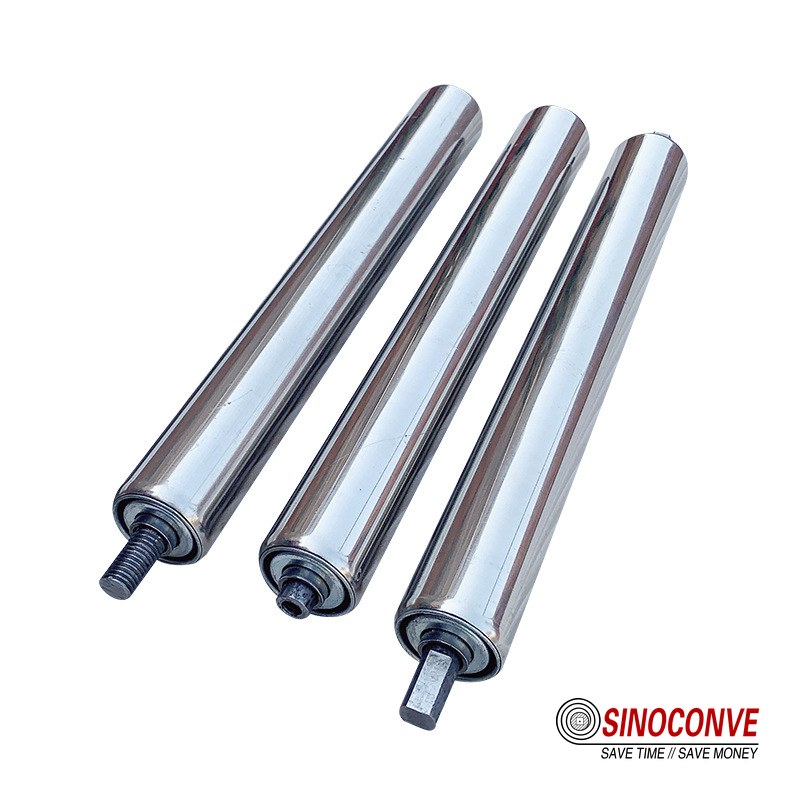
If you are re-speccing the rolls themselves — shell material, sealing, or load rating — our conveyor idler and roller guide and the conveyor roller product range cover the mechanical choices. This article stays on the sludge side of the equation, so we keep the roller spec brief here.
08How This Article Splits Work With Our Three Cleaner Guides
We deliberately narrowed this piece so it does not repeat what we have already published elsewhere.Three of our articles cover the neighboring ground, and we point to them instead of re-typing them here.If your question is about the cleaning hardware and when a scraper will not solve the problem, read conveyor belt cleaning methods, schedules, and when scrapers will not work. If it is about the wash system itself — nozzle layout, pressure, and control — go to the conveyor belt spray cleaning guide. And if you need the return-side hardware, scraper positioning, and belt-tracking fixes on the return run, the return side belt cleaning article covers it.
This article owns the middle ground the other three leave open: what happens to the material after it is scraped or sprayed off, and how to stop that material from becoming sludge that wrecks the return run. Think of it as the link between "clean the belt" and "keep the system running." The three guides tell you how to remove the material; this one tells you how to keep it from coming back as paste.
09Key Parameters: Belt Speed, Depth, Moisture, Water Pressure and Sump Size
The numbers below are the ones we actually ask for when a wet line calls us. They interlock, which is the point: you cannot change belt speed without touching water pressure, and you cannot set a cleaning interval without knowing the sump volume. Treat the table as a single system, not a list of independent settings.
Reading the Parameter Table
| Parameter | Typical range | Effect on carryback sludge | Action on a wet line |
|---|---|---|---|
| Belt speed | 1.5–3.5 m/s | More belt area per hour means more total carryback | Size the scraper and wash to the speed, not to the tonnage |
| Material depth at loading | 40–80% of belt edge height | Overloading pushes fines under the skirt | Keep the feed centered and below the skirt top |
| Surface moisture | 2–10% | Above about 5% the dust flips to paste | Measure at the transfer, not from the stockpile sample |
| Wash water pressure | 2–4 bar | Too high makes mist and a pool that re-wets the belt | Fit a flow meter and trim to the lowest pressure that clears |
| Sump capacity | Sized to daily inflow | Undersized pit overflows and re-wets the return run | Add 25% freeboard above the calculated volume |
| Cleaning interval | 8–24 h | Longer intervals need a bigger pit | Fix the interval first, then size the pit to match |
The belt itself is part of the parameter set. A cover compound that resists moisture uptake, matched to the product, carries less out of the load zone in the first place. That is a conversation to have early with your conveyor belt supplier, because changing the cover grade later means a splice and a shutdown, not a set screw. Buyers who order wholesale conveyor belts across several wet sites often standardize on one moisture-resistant grade precisely so the sludge behavior stays predictable from line to line.
The same lesson shows up on the drive side. As a V-belt manufacturer, we watch wet washdown water spray onto pump and agitator drive belts, and the belts slip and glaze exactly the way a wet conveyor cover does. When a transmission belt manufacturer sizes a drive that runs beside a spray bar, the wet environment gets derated in the same way a conveyor cover does. Water does not care which belt it is on.
10Failure Diagnosis: Six Reasons the Sludge Is Still There
You have scrapers on the head pulley. The spray bar runs. The sump gets cleaned. And the return idlers are still glazed by the end of every shift. That is the situation we walk into most often, and the fault is almost never the scraper. Work down this list in order — cheap checks first, expensive rebuilds last — and one of the six will usually name itself.
| # | Symptom | Most likely cause | Where to look first |
|---|---|---|---|
| 1 | Sludge along one belt edge only | Off-center loading or a worn skirt on that side | Feed point and skirt seal gap |
| 2 | Sludge returns minutes after cleaning | Scraper not touching, or water re-wetting the cover | Blade contact and spray bar aim |
| 3 | Mud caked on the middle idlers | Carryback migrating down the return run in the sag trough | Belt sag and idler spacing on the return |
| 4 | Sump overflows every wet shift | Pit undersized, or fines settled into the dead corners | Measure inflow against pit volume, check slope |
| 5 | Belt wanders only after rain | Water raising moisture, turning dry spill to paste | Rain ingress and washdown overspray |
| 6 | Idlers seizing and flat-spotting | Abrasive fines packed into the seal and shell gap | Roll sealing and return-side cleaning schedule |
Reason two deserves a sentence of its own. A scraper that is not touching the belt looks exactly like a scraper that is working, from the catwalk. You have to put a light on the blade or a hand on the tensioner. We also watch for the wet-cover trap: a spray bar aimed so the water runs forward under the belt re-wets the cover before the scraper, and the blade then skims a wet film it can never fully remove. That single aim adjustment has cleared up more "cleaner problems" than any new blade we have ever quoted.
On the tracking side of reason three and five, our EP conveyor belt tracking guide walks through the belt-wander fixes in detail, so we will leave the full sequence there and keep this list focused on the sludge causes.
11Maintenance and Downtime Windows: Shifts, Frequencies and Checklists
Sludge does not respect a monthly PM calendar. It builds in hours, so the routine that controls it has to be hourly and per-shift, not weekly. The good news is that the checks are fast. Most of them are visual, and a single operator can knock out the whole list in under ten minutes if the points are easy to reach.
A Shift-Level Cleaning Routine
| Check | What to look for | Action | When |
|---|---|---|---|
| Return idlers | Glazing, caked fines, seized rolls | Scrape and check free spin | Start of shift |
| Spray bar | Clogged nozzles, misaligned aim | Clear nozzles, re-aim toward the sump | Start of shift |
| Skirt seals | Gaps, scalloping, dust blowing out | Adjust gap, flag for replacement | Weekly |
| Sump level | Rising level, settled fines at the pump | Pump down, clear the suction pocket | Each shift |
| Belt edge | Raised bead of fines along the edge | Trim the bead, find the source | Weekly |
Downtime is where the plan usually falls apart. If the only time the crew can clean is the same hour the maintenance team needs for a scheduled rebuild, the cleaning never happens. We advise plants to separate the two: a short, standing cleaning window at shift handover for the quick items, and a longer monthly window for skirt replacement, sump desludging, and scraper re-tension. A 10-minute daily routine that actually runs beats a 4-hour monthly routine that always gets skipped.
Write the checks into the CMMS with the same severity as a gearbox temperature alarm. The moment sludge cleaning becomes an "if we have time" task, it stops happening, and the return run re-coats itself inside a week. We have seen a line go from clean to fully glazed in nine days after the cleaning log was quietly dropped.
Season matters more than the calendar suggests. A line that runs clean through a dry summer will glaze inside a week once the autumn rains start, because the same spill that used to blow away now sticks. We tell plants in wet climates to pre-stage the winter routine — extra skirt seal stock, a spare set of return rolls, and a desludging schedule — before the first rain, not after the first overflow. The crews that do this lose a few hours in October and save the whole wet season.
12Procurement and Acceptance Checklist: What to Ask Before You Order
Most wet-line parts get bought in a rush after a failure, which is how the wrong skirt, the wrong roller, or the wrong belt ends up on the line. The fields below are what we ask every buyer to pin down before the PO goes out. They map one-to-one to the failure causes in section 10, so if you fill in the table, you have already diagnosed the line.
The Seven Fields That Belong in Every RFQ
| Field to specify | Why it matters | What to write down |
|---|---|---|
| Material and moisture | Decides carryback behavior and cover grade | Product, top size, % fines, moisture range |
| Belt speed and width | Sets scraper and wash sizing | m/s and mm, not "a fast belt" |
| Wash water available | Pressure and flow drive the spray and sump | Pressure in bar, flow in L/min, hours/day |
| Sump location and volume | Sets cleaning frequency | Volume in m³ and pump duty |
| Operating hours | Converts per-hour carryback into per-day sludge | Hours per day and shifts per day |
| Existing cleaners | Shows what is already failing | Type, location, and last service date |
| Spare and service access | Parts that cannot be reached do not get maintained | Walkway and clearance around the transfer |
For a quarry or aggregate plant, the same RFQ should name the industry context up front. A wet mining and quarrying transfer has different skirt and idler needs than a dry port terminal, and spelling that out saves a round of corrections. If you buy through a conveyor belt distributor, hand them these seven fields instead of a one-line description; the distributor can then quote the right grade the first time, and you get an apples-to-apples comparison across suppliers.
13Installation and Commissioning Mistakes That Undo a Good Design
A well-specified system still fails if it is installed a few degrees off. The mistakes below are the ones we correct most often during commissioning walks, and each one quietly re-creates the sludge the design was supposed to remove. None of them shows up on a drawing.
The Two Errors We See Most at Commissioning
The first is a skirt seal set against a cold belt and never re-checked after warm-up. The belt stretches, the gap opens, and the first hour of production sprays fines out the side exactly where the engineer swore the seal was tight. We re-check every skirt gap at operating temperature, with material on the belt, before we sign off on a transfer.
The second is a spray bar aimed by eye instead of by flow. A nozzle that looks straight on the ground can be throwing water three idlers downstream once the belt is moving, re-wetting the return run instead of flushing it. We commission wash systems with the belt running and a flow meter on the header, and we mark the final nozzle angle on the bracket so the next shift cannot "fix" it by accident.
Two smaller traps complete the list. A sump pump suction set a few centimeters above the floor leaves a permanent layer of settled fines that hardens into a false floor, so the pit effectively shrinks every week. And a return-side guard bolted too close to a fouled idler becomes the surface the wandering belt grinds against, which wears the edge and hides the real fault. Both are five-minute fixes at commissioning and week-long headaches once the line is in production.
A third mistake is tensioning a scraper against the direction of belt travel, or reversing a blade that has a directional bias. It wears instantly, chatters, and throws the removed material sideways instead of down into the flow. Check the blade arrow and the tensioner geometry against the belt run before you release the line. A fourth is sealing a splice or a repair patch in the same spot the spray bar hits, which gives the water a seam to force into and a ledge to catch fines on. Neither one appears on the as-built drawing, and both undo an otherwise sound design.

14FAQ
How much carryback is actually normal on a clean belt?
On a dry, well-set line, under about 20 g/m² is a reasonable target. Sticky fines in wet service will run higher, often 60–100 g/m² even with a good scraper. The useful number is the trend, not a single reading — measure it the same way, at the same point, every time.
Why does the sludge keep coming back even after we install a scraper?
Because the scraper was never the problem. If the load zone leaks and the wash bar floods, the scraper only removes a slice of a much larger carryback stream, and the rest still becomes sludge. Fix the containment and the water first, then judge the scraper.
Does a faster belt make carryback sludge worse?
Yes, and it is arithmetic, not opinion. Carryback scales with belt area, so a belt at 3.0 m/s passes about 20% more surface than the same belt at 2.5 m/s, and it sheds that much more material per hour.Speed up a wet line and the sump has to grow with it.
How often should we clean the sump and the return idlers?
Return idlers need a visual check every shift on a wet line, and a scrape when they start to glaze. The sump cleaning interval is set by its volume against the daily inflow — on the worked example in section 06, that is every 8 hours for a 16–18 m³ pit. Size the pit to the interval you can actually hold, not the one you wish you could.
Can we reuse the wash water, or does it all go to a treatment pond?
Reuse it. Run the slurry through a dewatering screen or settling cone near the transfer, pull the fines out early, and the clarified water returns to the spray bars. The water left in the sump is then mostly clear and cheap to pump, and you send far less volume to treatment.
Is carryback sludge only a maintenance problem, or does it shorten belt life?
It shortens belt life directly. Caked idlers drag and heat the cover, a fouled return run steers the belt into fixed structure, and the edge wears against guards and stringers. The belt rarely fails from the sludge itself — it fails from the misalignment and drag the sludge creates.
What moisture content turns carryback into sludge?
Around 5% surface moisture is the usual tipping point for fine material; below that it behaves like dust, above that it smears and packs. The exact number shifts with the material, which is why we measure moisture at the transfer rather than quoting a universal rule.
Do we need a full skirtboard retrofit, or can we fix it with adjustable parts?
Start with adjustment. Many "failed" skirtboards just have a worn or mis-set seal, and a few millimeters of gap correction stops most of the side spill. Retrofit only when the geometry itself is wrong — the skirt too short for the speed, or the drop too far off center.
How do we spec this in an RFQ so we compare suppliers fairly?
Give every supplier the same seven fields from section 12: material and moisture, belt speed and width, wash water, sump volume, operating hours, existing cleaners, and access. Without them, two quotes for "wet line parts" can describe two completely different systems.
15Related Products You May Need
- Conveyor Rollers — return-side, self-cleaning and impact rolls for wet bulk lines.
- Rubber Conveyor Belt — moisture-resistant cover grades matched to sticky, damp material.
- EP Rubber Conveyor Belt — EP fabric carcass for quarry and aggregate duty.
- Chevron Conveyor Belt — patterned covers where wet fines slip on the incline.
- Heat Resistant Conveyor Belt — for hot, dry product streams that run beside wet washdown zones.
- Product Catalog — the full belt and roller range in one place.