Conveyor belt splice failure is a system fault before it is a belt fault: the joint opens, lifts, cracks, delaminates or breaks because preparation, splice geometry, tension, pulley geometry or the jointing method was not matched to the belt construction. Read the failure pattern first, then correct the operating condition that created it — replacing the belt rarely solves the problem on its own.
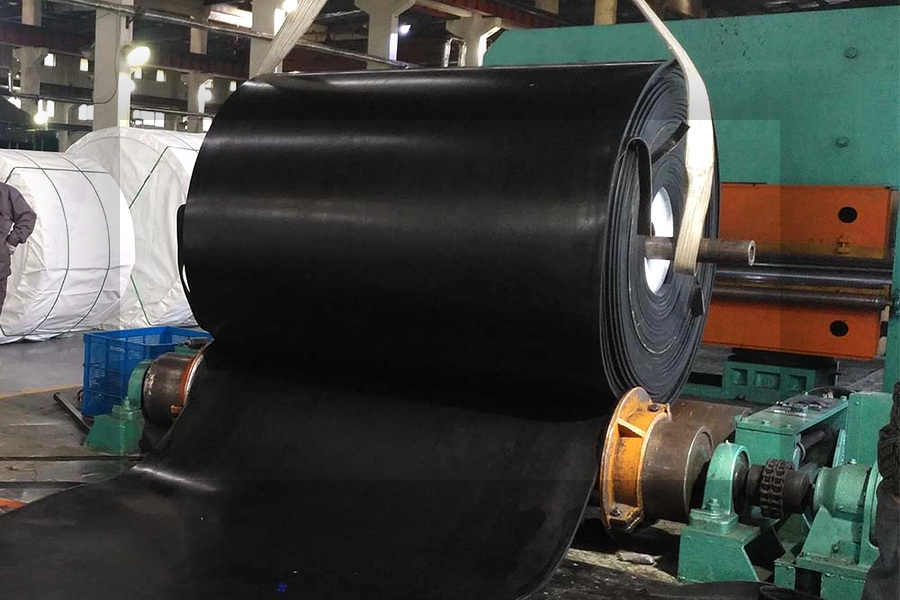
A conveyor belt splice is the mechanical and tensile connection that allows a belt to form a continuous loop. It is also one of the most failure-sensitive parts of a conveyor system. A belt may have adequate cover rubber, carcass strength, and remaining service life, yet still stop production because the joint opens, lifts, cracks, or separates.
For importers, distributors, and maintenance teams, the right question is not simply “Which splice is strongest?” The better question is: What failure pattern is occurring, what operating condition created it, and which jointing method and installation controls fit the belt construction?
This guide provides a practical way to diagnose conveyor belt splice failure and prepare a clearer replacement or new-project specification.
Why conveyor belt splices fail before the belt body
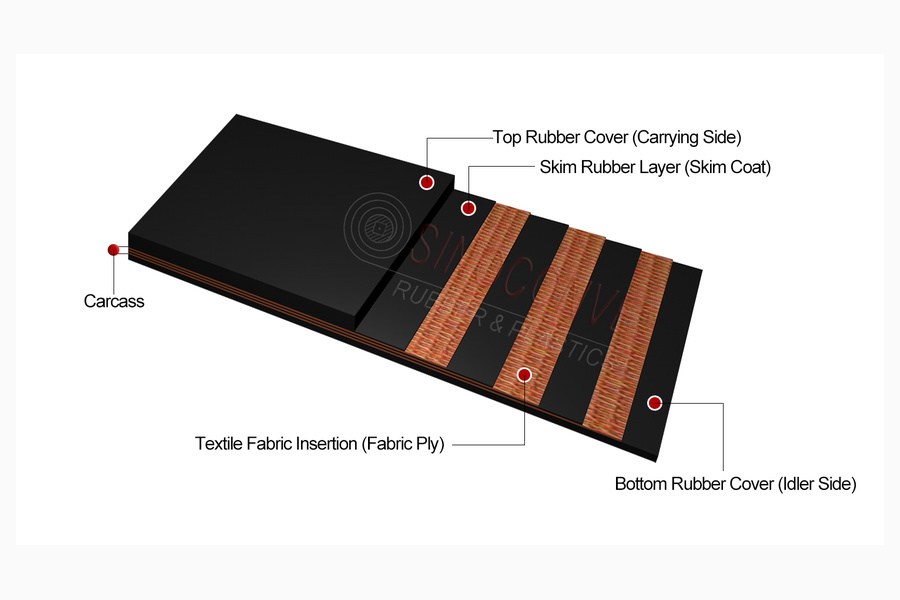
The splice is a transition zone. It must transfer belt tension through a prepared overlap, bonded area, fastener set, or other approved joint design. It must also pass repeatedly around pulleys, flex through idlers, tolerate loading-zone impact, and remain aligned with the belt.
That means a joint can be affected by several variables at the same time:
- Belt construction, including textile plies or steel cords
- Cover grade and belt thickness
- Pulley diameters and take-up movement
- Belt tension and start-up load
- Joint preparation, temperature, pressure, and curing time
- Alignment and tracking
- Material impact, moisture, oil, heat, or contamination
- Operator workmanship and inspection discipline
A splice should therefore be treated as a system decision, not as an isolated repair consumable.

Eight common conveyor belt splice failure patterns
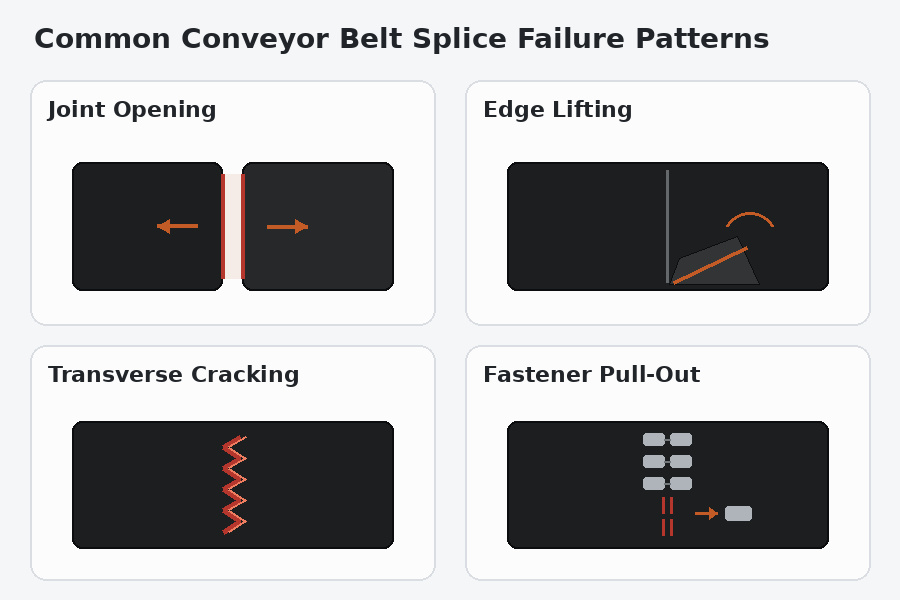
1. The splice opens along the joint line
An opening joint usually indicates inadequate adhesion, insufficient overlap, contamination, incorrect bonding conditions, or a splice design that does not match the belt construction. In a hot-vulcanized joint, the prepared surfaces must be clean and correctly treated. In a mechanically fastened joint, fastener selection, spacing, installation depth, and belt compatibility all matter.
Inspection focus: identify whether separation begins at the edge, the center, a pulley transition, or a damaged fastener line. The starting point often reveals whether the main cause is preparation, bending stress, impact, or alignment.
2. Edge lifting or edge separation
Edge lift is often visible before a complete joint failure. The belt may show a raised corner, exposed skim rubber, or a thin opening that collects dust and moisture. Common contributors include inaccurate cutting, uneven splice geometry, poor edge sealing, excessive belt tension, and mistracking that repeatedly loads one side of the joint.
Do not correct edge lift by trimming the visible section alone. First confirm belt tracking, pulley alignment, take-up condition, and the joint dimensions.
3. Transverse cracking across the splice
Cracks that run across the belt width may be linked to repeated bending, excessive stiffness at the joint, inadequate flexibility, thermal aging, or an unsuitable pulley diameter. A splice that is much stiffer than the belt body can experience a concentrated bending transition every time it passes a pulley.
The investigation should compare the crack location with pulley positions and operating temperature. It should also check whether the belt is being run below the pulley diameter recommended for its construction.
4. Delamination between plies or cover layers
Delamination means that layers separate where they should remain bonded. It can be caused by inadequate adhesion, trapped contamination, moisture during preparation, poor curing, excessive heat exposure, or repeated flexing under conditions beyond the joint design.
A supplier should not diagnose delamination from a photograph alone. Request the belt construction, cover thickness, jointing method, operating temperature, and service history. If the belt has been exposed to oil or chemicals, verify compound compatibility as well.
5. Fastener pull-out or fastener-line damage
Mechanical fasteners can be useful when installation time or field conditions make vulcanization impractical, but the fastener system must be matched to belt thickness, tension, pulley geometry, and conveyed material. Pull-out can occur when the fasteners are under-sized, incorrectly installed, too close to the belt edge, or exposed to excessive tension and impact.
A fastener line can also create a secondary risk: damaged pulley lagging, belt cleaner interference, or material leakage. When specifying a mechanically joined belt, include the fastener type and installation requirements rather than describing the joint only as “mechanical.”
6. Joint mistracking and uneven wear
A belt may track correctly along most of its length but wander when the splice reaches the pulley or return path. This can indicate that the joint is not square with the belt centerline, the belt ends were not aligned during preparation, or the splice thickness is uneven.
Uneven joint thickness can also create a repeating impact as it passes over rollers. Over time, that impact may damage the joint, idlers, cleaners, and pulley surface.
Practical check: mark the belt centerline and observe whether the splice enters the loading zone and pulleys squarely. Also inspect the first return roller and cleaner contact point after the joint passes.
7. Premature wear at the splice
When the joint surface wears faster than the surrounding cover, the problem may be an uneven transition, excessive material contact, cleaner pressure, or a cover material mismatch. A raised joint can act like a scraper against cleaners and loading components.
For abrasive materials, confirm that the joint cover and belt cover have a compatible wear profile. The best solution may involve improving the splice geometry or cleaner setting rather than simply selecting a belt with a higher nominal abrasion grade.
8. Complete belt break near the splice
A belt break close to the joint is a high-risk failure. Possible causes include stress concentration, inadequate joint strength, over-tensioning, shock loading, pulley incompatibility, carcass damage during preparation, or a splice that was made for a different belt construction.
Do not reuse the same jointing procedure without a failure review. Preserve the failed section, photograph both sides, record the belt direction, and identify the location relative to pulleys and loading points. This evidence helps the supplier distinguish a material failure from an installation or system failure.
Failure pattern and first response
| Observed condition | First questions to ask | Typical corrective direction |
|---|---|---|
| Joint opens at the center | Was the prepared surface clean and fully bonded? | Review preparation, adhesive, pressure, curing, and overlap |
| One edge lifts | Is the belt tracking or splice square? | Check alignment, edge sealing, and take-up tension |
| Cracks at pulley transition | Is the joint too stiff for the pulley geometry? | Review belt flexibility, pulley diameter, and joint design |
| Fasteners pull out | Are fastener size, spacing, and installation correct? | Recalculate joint suitability and installation method |
| Joint wears faster than belt | Is the transition raised or cleaner pressure excessive? | Correct joint profile and cleaner setting |
| Break near splice | Was the carcass damaged or overloaded? | Preserve evidence and perform a full engineering review |
The table is a diagnostic starting point, not a substitute for an application-specific assessment.
Hot-vulcanized or mechanical splice: how to decide
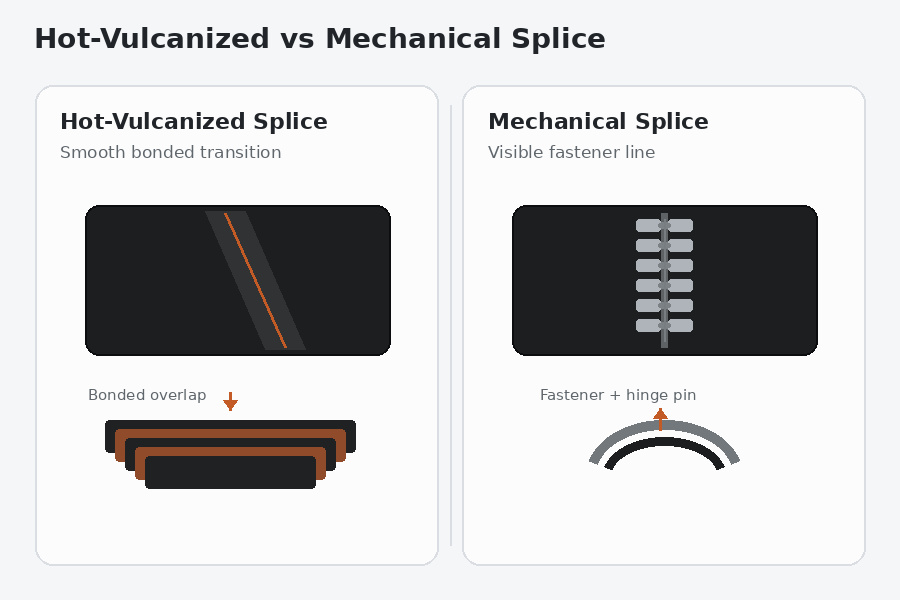
The jointing method should follow the belt construction, field conditions, available equipment, and required service performance.
| Decision factor | Hot-vulcanized splice | Mechanical splice |
|---|---|---|
| Joint continuity | Bonded joint with a smooth transition when correctly made | Fastener line creates a mechanical transition |
| Installation resources | Requires press, trained personnel, controlled preparation, and curing | Can be faster in some field conditions and easier to replace locally |
| Belt and pulley compatibility | Must follow the belt maker's construction and splice procedure | Must follow fastener maker's limits and belt compatibility |
| Best procurement practice | Specify splice design, belt construction, and curing requirements | Specify fastener system, spacing, edge clearance, and installation method |
| Main risk | Poor preparation or curing can remain hidden until loading | Pull-out, cleaner interference, leakage, or excessive joint stiffness |
Neither method is automatically correct for every conveyor. A supplier should receive the belt width, tensile rating, carcass type, thickness, operating tension, pulley diameters, material characteristics, temperature, and field installation conditions before recommending the joint.
Splice failure mode, root cause and field action
Every failure mode below has a limited set of causes, and each cause leaves evidence that can be confirmed on site without laboratory testing. The table maps the four things a maintenance team needs in order: what failed, why it failed, what to look for to confirm the cause, and what to do about it. It is written to sit alongside a review of conveyor belt jointing methods, because the method chosen at installation sets the limits that the splice will later fail within.
| Failure mode | Most likely root cause | Field evidence to confirm it | Corrective action |
|---|---|---|---|
| Joint opens along the centre line | Bonding surface contaminated or under-cured; overlap shorter than the carcass needs | Exposed fabric with glossy, unbonded skim rubber; separation begins away from both edges | Re-cut and re-buff the ends, then re-cure with the overlap and cycle set from the carcass, not the belt width |
| Edge lifting on one side only | Splice not square to the centreline, or persistent mistracking loading a single edge | The gap widens on the same side at every pulley pass; belt wanders each time the joint passes | Square the belt ends, correct pulley and idler alignment and take-up, then re-splice |
| Transverse cracking across the joint | Joint much stiffer than the belt body, or a pulley diameter below the belt rating | Cracks repeat on a fixed pitch and always at the same pulley | Move to a lower-step or more flexible splice design and confirm pulley diameter against belt data |
| Delamination between plies | Moisture or solvent trapped during preparation; service temperature above the compound rating | Ply separation with chalky or discoloured rubber at the interface | Dry the belt and control workshop humidity; verify the compound against the temperatures in this comparison of heat resistant belt grades |
| Fastener pull-out or torn edge | Fastener size, spacing or edge distance outside the maker's chart | Enlarged holes, torn belt edge, damaged lagging opposite the fastener line | Recalculate fastener selection for actual tension and pulley geometry, or convert to a vulcanized joint |
| Joint wears faster than the belt | Raised splice profile, or cleaner blade pressure too high at the joint | Polished, rounded joint surface; cleaner chatter or burning marks at the joint only | Dress the joint flush with the cover and re-set cleaner blade pressure and blade condition |
| Break directly beside the splice | Stress concentration from shock load, over-tension, or carcass damaged during preparation | Fresh tear at the step edge while the belt body away from the joint is intact | Preserve the failed section, review start-up and loading, and re-specify joint strength before rebuilding |
Joint efficiency and downtime by jointing method
Joint strength is normally expressed as a percentage of the belt's own tensile strength, so the same method gives different results on different carcasses. The ranges below are indicative and should always be replaced by the belt maker's approved splice design. Downtime is dominated by how the joint is made rather than by the method name: a vulcanized joint needs press, cure control and the details covered in this vulcanizing machine guide.
| Jointing method | Typical joint efficiency | Best-fit belt construction | Setup and downtime | Checks before acceptance |
|---|---|---|---|---|
| Hot vulcanized, fabric ply | About 80–100% of belt tensile strength | Textile EP or NN plies, 2–5 ply, general duty | Press and controlled cure; commonly 2–6 hours per joint | Step count and step length per carcass, cure temperature log, pressure held for the whole cycle |
| Hot vulcanized, steel cord | About 70–90% of belt tensile strength | Steel-cord belts on high-tension main lines | Multi-step press and longer cure; commonly 6–12 hours | Cord spacing preserved, step alignment, cure measured at the splice centre rather than the platen |
| Cold bonded | About 50–80% of belt tensile strength | Light-duty textile belts on low-tension lines | No press; often 1–4 hours before the belt is tensioned | Buffing and full drying, adhesive mix ratio, clamp pressure, cure time at ambient temperature |
| Mechanical fasteners | About 40–75% of belt tensile strength | Thin belts, emergency repair, low-tension or short-run conveyors | Fastest option; frequently under 1 hour | Fastener size and spacing per maker's chart, edge distance, hinge pin condition, pulley clearance |
| Stepped or finger splice | Up to about 90% on fabric belts when correctly made | Fabric belts that need a flush, low-profile joint | Similar to hot vulcanizing, with longer layout time | Finger length and fit, no gaps at the interlock, full cure before the belt carries load |
Reading splice inspection results: what is acceptable
Inspection only becomes useful when the numbers lead to a decision. The thresholds below are the practical limits used on site as a rule of thumb; where the belt maker issues acceptance criteria for the joint, those take precedence. A joint that is monitored against a written limit rarely fails without warning, which is also why a factory-made endless conveyor belt removes an entire failure mode on critical lines.
| Check at inspection | Acceptable at handover | Investigate now | Take the belt out of service |
|---|---|---|---|
| Joint line opening | No visible separation and the joint edge is sealed | Edge opening under about 2 mm with no fabric exposed | Any opening exposing fabric or cord |
| Splice thickness | Flush with the cover, less than about 1 mm proud | Between about 1 mm and 2 mm raised over the joint | More than about 2 mm raised, or a step that strikes the cleaner |
| Splice squareness | Ends square within roughly 0.5% of belt width | Between about 0.5% and 1% out of square | Visible diagonal at the joint with tracking movement at every pass |
| Fastener condition | All fasteners seated and the hinge pin free | One or two fasteners loose or missing | Fastener line pulled through or the belt edge torn |
| Cure record | Temperature and time logged for the full cycle | Part of the cycle missing from the log | No record and a soft, spongy joint |
A splice inspection checklist for buyers and maintenance teams
Before accepting a new belt or approving a repair, record the following:
- Belt identity: width, length, construction, cover thickness, and any marking on the belt.
- Joint position: distance from the nearest drive pulley, tail pulley, loading point, and cleaner.
- Failure pattern: opening, edge lift, cracking, delamination, fastener damage, wear, or breakage.
- Operating data: capacity, speed, start-up method, tension or take-up arrangement, and operating temperature.
- Material condition: lump size, impact, moisture, oil, chemicals, and contamination risk.
- Pulley and idler condition: diameter, lagging, alignment, seized rollers, and return-path interference.
- Installation record: jointing method, date, operator, adhesive or fastener details, and curing conditions where applicable.
- Photographic evidence: full belt direction plus close-ups of both sides and the joint edges.
This record turns an emergency repair into useful procurement data.
How to write a better conveyor belt splice RFQ
A weak RFQ says: “Please quote a replacement belt with joint.” A stronger RFQ explains the operating boundary and the failure that must be prevented.
Include:
- Belt width, length, and construction
- Nominal tensile rating or steel-cord designation where applicable
- Top and bottom cover thickness and required compound properties
- Conveyor speed, capacity, incline, and take-up arrangement
- Pulley diameters and loading-zone conditions
- Conveyed material, lump size, moisture, oil, and temperature
- Preferred jointing method or request for a supplier recommendation
- Required splice strength, inspection documents, and acceptance criteria
- Whether the work is factory-made, field-made, or both
For textile belts, ISO 14890 may be relevant to the specification of rubber- or plastics-covered textile conveyor belting for general surface use. ISO 9856 provides a method for determining elastic and permanent elongation. These references do not replace the application review, but they help buyers ask for comparable technical documentation.

FAQ
Can a conveyor belt splice fail even when the belt cover looks new?
Yes. A joint can fail because of preparation, bonding, alignment, bending, tension, impact, or pulley compatibility even when the surrounding cover has little wear.
Is a hot-vulcanized splice always better than a mechanical splice?
No. The correct method depends on belt construction, operating conditions, installation resources, pulley geometry, maintenance requirements, and the approved joint design.
Why does a splice lift on only one side?
Common possibilities include a splice that is not square, mistracking, uneven preparation, non-uniform thickness, or excessive edge loading. Inspect the conveyor system before trimming or rejoining the belt.
What information should I send to a belt supplier after a splice failure?
Send belt markings, dimensions, photos, failure location, service time, operating conditions, pulley diameters, jointing method, and any installation record. Preserving the failed section is useful when possible.
How can repeat splice failure be reduced?
Use a joint design matched to the belt construction, control preparation and installation, inspect alignment and pulley conditions, and include the actual operating data in the RFQ.
Conclusion: treat the splice as an engineered component
Conveyor belt splice failure is rarely solved by buying a belt with a higher headline strength alone. The durable solution comes from connecting the failure pattern to the operating condition, jointing method, belt construction, and installation controls.
If you are replacing a failed belt or preparing a new conveyor specification, send SINOCONVE the belt dimensions, construction, service conditions, pulley data, and photos of the failed joint. Our team can review the application and recommend a belt and splice configuration for quotation.